Copyright Info

Everything here, including text, photographs, designs, and graphics, are Copyright © Stacey King, except where otherwise noted. They are shared for personal use and inspiration only. Please do not copy ANYTHING on this site without my permission. Thanks!

Way cool people who follow my blog!

Search & Win


Low budget/no budget marketing resources from Punk Poultry Media

Saturday, March 22, 2008

Make a Splash


I am just tickled with these pages! I used my March 15 Demo Challenge sketch as a starting point, though rotated the page layouts. See the sketch at the bottom of my previous post.

Base is Soft Sky inked with Tempting Turquoise. Basic black for the photo mats, all punched with the 1/4" square punch. Signo gel pen for margin text. Bashful Blue CS and a hobby knife for the stylized water swirls (sponged a tad with Bashful Blue ink). Only Orange and YoYo Yellow for the flowers, punched with 5-Petal and Boho Blossoms punches.

The title was done in Photoshop. I used a portion of the water from another photo in a clipping mask inside the text. Font is Showcard Gothic. Added a few outside strokes, printed on photo paper, and cut out. Popped up on dimensionals.

Thanks for visiting!

Friday, March 14, 2008

Santa Elena Canyon layout


This is my sample for the March 15th Demo Scrapbook Challenge at SCS!

I used Spring Break DSP again (versatile stuff!), and for the first time ever ran a scrapbook page through my sewing machine. I started out using hardware store jute twine on the big flower, but decided against it when I put my photos in. The twine is sheddy and stinky, and ended up being too bulky. The only stamps used are the retired Letterpress alphabet.

I think the hardest part of this layout was cutting out the letters for the title! Easy stuff.

Stamps: Letterpress alphabet (retired)
Paper: River Rock, Blue Bayou, Old Olive, Spring Break
Ink: Classic Olive & Bayou, Craft Olive
Accessories: Felt Flowers, 5-Petal Flower punch, Photo Corners punch

Oh, and here's the sketch I did for the challenge:

Thursday, March 6, 2008

More Stamps for Sale

Cleaning out again, and have another batch of retired stamp sets to offer...

Along the Same Lines -- 2005-06 Level 2 Hostess set. Words mounted separately on side. $10.00


Alphabet Soup
-- 2006 Sell-A-Bration set. $7.00


Best Blossoms -- SOLD


Fresh Fillers -- SOLD

Gently Falling -- 2006 Sell-A-Bration set. $7.00

Monday, March 3, 2008

Boho-timous Layout


This is a layout done for a scrapbook sketch over in the demo forum at SCS. It's odd, but having a challenge makes my brain work better. And this one was especially easy because those dark blue mats are just untrimmed 8-1/2x11" pieces of cardstock. No measuring necessary!

Of course I've misplaced my coluzzle circle template, so I had to cut all those circles by hand (for the green ones I traced around the top of a EP container, for the white 'photo' ones I traced around the bottom.) They're a little wobbly in places, but they work!

Stamps: Boho Backgrounds
Ink: Bayou Blue, Pumpkin Pie, Soft Sky, Old Olive
Paper: Same as Ink, kraft, Spring Break DSP
Punches: Round Tab, 5-Petal flower, 1/2" Circle, Photo Corners

Here's the sketch I worked from:

Saturday, March 1, 2008

Tangy Turquoise!


This is a card I did yesterday, and I'm just tickled with the way it turned out! It consists of a Tempting Turquoise card base sponged with TT ink to give some tonal variations. Over that is a piece of Cuttlebug-embossed acetate (overhead projector film rescued from the recycle bin at my kids' school). Faux-chipboard orange pieces are adhered to a distressed piece of Pumpkin Pie. Faux-chipboard word window with eyelets adhered at bottom. See tutorial below on making the faux chipboard elements. (For each 'chipboard' element on this card, I used three pieces of kraft CS and one non-kraft piece rather than four kraft pieces).

Stamps: Tart & Tangy, Celebrate Everything
Paper: Tempting Turquoise, Pumpkin Pie, W. White, Kraft, Summer Sun, acetate
Ink: Summer Sun, Pumpkin Pie, Tempting Turquoise
Accessories: Word Window punch, 1-1/4" Circle punch, Cuttlebug & embossing folder, Crop-a-Dile, eyelets.
Techniques: Rock-n-Roll, faux chipboard

DIY Chipboard Shapes (or 'Faux Chipboard')

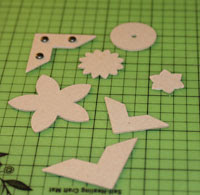
I've grown partial to chipboard shapes for cards and scrapbook pages lately. They come in various large assortments (from SU! anyway), but what if you want 30 large chipboard photo corners for a scrapbook class? You'd have to order six packs of OnBoard Blossoms and Basics at $15 each. YIKES! And you'd have a whole lot of extra shapes that you'd need to figure out how to use.

This was my dilemma recently. I'm certainly not spending $90 for 30 chipboard photo corners, so I had to come up with another solution. I really didn't want 'flat' photo corners, but.... What if I stacked up four or five punched shapes and glued them together like plywood? That would give me the bulk of chipboard without the expense. All I'd need would be my photo corners punch, a bottle of glue, and three sheets of kraft cardstock.

IT WORKED!

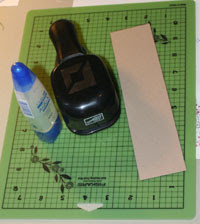
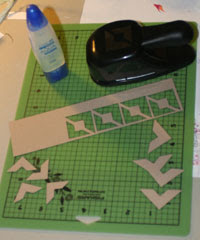
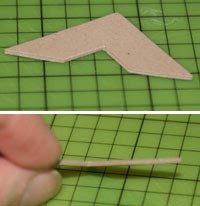
Here's How I did it: First assemble your supplies (I'm using scraps for now), and punch out four identical shapes.

Now apply liquid glue to top of one your pieces. Not too much or it will squish out the sides. Be sure to dab glue in any corners. (I prefer the Tombow Mono Aqua glue over the Tombow Mono Multi for this project. The Aqua dries STIFF and non-tacky, more like chipboard. The Multi remains flexible and sticky.)

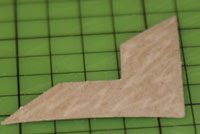
Now carefully lay another punched shape on the glue and slide around so that it is exactly on top of the previous shape. Repeat two more times. You'll end up with a thick, rigid shape, very much like chipboard.

What's cool about this is that it works with just about any punch you have (obviously the corner rounder, ticket corner and such won't work).

(Incidentally, I don't plan to glue all 30 photo corners. I plan to put the punched shapes in the kit bag and have each participant glue their own.)

Give it a try!